How to Set Up OpenVPN on Synology NAS and Configure Clients

Setting up OpenVPN on a Synology NAS allows you to securely connect to your NAS from anywhere. Here’s a step-by-step guide to help you set up OpenVPN on your Synology NAS and configure clients.
Synology NAS OpenVPN Setup
Step 1: Install the VPN Server Package
- Log in to DSM: Access your Synology NAS's DSM (DiskStation Manager) interface.
- Open Package Center: Navigate to the Package Center.
- Search for VPN Server: Find and install the VPN Server package.
Step 2: Configure OpenVPN Server
- Open VPN Server: Once installed, open the VPN Server application.
- Enable OpenVPN: Select "OpenVPN" from the left-hand menu and enable it.
- Configuration Settings:
- Port Number: Default is 1194.
- Protocol: Set to UDP.
- Encryption: Choose your preferred encryption settings.
- Client DNS: Optionally configure DNS settings for clients.
- Export Configuration: Click “Export configuration” to download the OpenVPN configuration file (.ovpn).
Step 3: Adjust Firewall and Port Forwarding
- Firewall Rules: Ensure that your NAS firewall allows UDP traffic on the OpenVPN port (default 1194).
- Port Forwarding: Configure your router to forward UDP port 1194 to the IP address of your NAS.
OpenVPN Client Setup
Step 1: Install OpenVPN Client
- Windows/Mac: Download and install the OpenVPN client from OpenVPN's official site.
- Mobile Devices: Install the OpenVPN Connect app from the App Store (iOS) or Google Play Store (Android).
Step 2: Import Configuration
- Transfer Configuration File: Move the
.ovpnconfiguration file exported from the NAS to your device. - Import Configuration:
- Windows/Mac: Place the
.ovpnfile in the OpenVPN configuration directory (usuallyC:\Program Files\OpenVPN\config). - Mobile Devices: Open the OpenVPN Connect app and import the
.ovpnfile.
- Windows/Mac: Place the
Step 3: Connect to OpenVPN
- Launch OpenVPN Client: Open the OpenVPN client on your device.
- Connect: Select the configuration file and click “Connect”.
- Authentication: Enter your Synology NAS username and password if prompted.
Step 4: Verify Connection
- Check IP Address: Ensure your device has been assigned an IP address from the OpenVPN network.
- Access NAS: Test by accessing your Synology NAS’s local IP address or shared folders.
Troubleshooting Tips
- Firewall Settings: Ensure both NAS and router firewalls are correctly configured.
- Port Forwarding: Verify that the port forwarding settings on your router are correct.
- Log Files: Check the OpenVPN log files on both the server and client for errors.
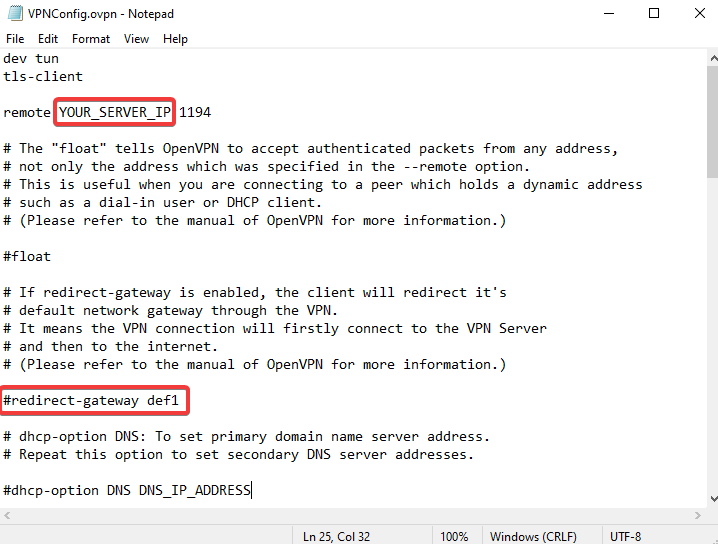
The correct functioning requires modification of the file.

By following these steps, you can securely connect to your Synology NAS using OpenVPN from any location. This setup ensures your data is encrypted and secure while accessing your NAS remotely.

